
The COVID-19 pandemic has affected all of us in one way or another. Businesses have closed their doors. Many of us know someone who has been sick or may have gotten sick ourselves. The worst was having to tell our patrons, “No, we don’t want you coming to the library.” What are we if we cannot offer services to the community?
In very short order, we had to adjust what we do and how we do it. We encouraged patrons to use digital resources rather than physical ones. We developed virtual programming and introduced YouTube story hours. We did everything we could to encourage patron library use without coming to the library. But, as the weather got nicer and cabin fever became an issue, patrons were looking for a reason to get back outside.
During one of the many hours I spend online during the quarantine, I saw a short video, posted by a library in Nebraska, about a sidewalk obstacle course they had made. I did some quick research and discovered that sidewalk obstacle courses are easy and inexpensive to do. They drive patrons to the library, encourage patron engagement, and they promote activity and movement at the library. I did a quick proposal to our director and included the video. Our sidewalk obstacle course was going to happen!
Over the course of the weekend, I did some “idea shopping” and gathered the supplies I needed. My first step was to identify a location for our course. IPDPL – Germantown Hills is one of our newest facilities, and the sidewalk that passes in between our parking lot and building is part of a popular community walking path. Many people use that sidewalk, even if they are not coming to the library, so community awareness and engagement were already built into the location.
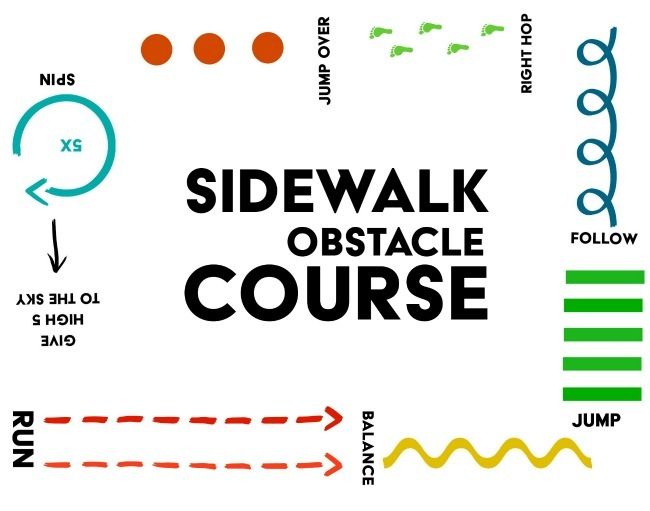
My next step was a Google search for “sidewalk obstacle course.” In the images, I saw an obstacle course legend that became my guide. If you are going to install one of these at your own facility, be sure to look at several different images, including the ones done with chalk, as there are additional activity possibilities to include. I considered including some of the calisthenic challenges, like touching toes or doing jumping jacks, but I did not want users stopped in one place. By keeping things moving, it avoids any social distancing issues that might be created by having one party have to go around a second party. If the course were somewhere else, like a courtyard or an out-of-the-way corner of a parking lot, then including those segments might be more appropriate. There was also a “Hop on One Foot” segment in the legend, but I had little confidence in my ability to paint a proper footprint, so I skipped that one, as well. Which segments to include and the order to include them are completely arbitrary.
Supplies to install the obstacle course were very simple and inexpensive. Chalk, some string, basic acrylic craft paint, some disposable foam brushes, and a few paper party cups make up the entire supply list for our course. The paint I used was Craft Smart from Michaels. An 8 oz. bottle runs about $3, and I have plenty of paint left over for other projects. Acrylic craft paint is non-toxic, dries quickly, and has easy cleanup. In its liquid form, it is water-soluble, but it is permanent once it dries. It also adheres well to a wide variety of surfaces, including concrete. I used 1” and 2” disposable foam brushes for application. I had considered using painter’s tape or stencils to mark out some items but decided against that based on the additional time it would take. I had a two-day window where there was little rain in the forecast, so I needed installation to be quick.
Finally, I planned out the course in chalk before I began painting. I started with identifying where each segment would begin, and then painted in the instructions. Then I moved on to painting the elements within each segment. For the “Spin” segment, I made a simple compass out of string and chalk to draw my circle. My son “tested” the Spin segment by spinning in circles three, four, and five times. He determined five spins was just one too many and he would be too dizzy to continue the course!
Altogether, chalking the course and painting it took about 5 hours. The craft paint covered well, so for most segments I only needed one coat of paint. The paint dried so quickly that, in most cases, by the time I was finishing painting a segment, the paint at the beginning of that segment was already dry.
I spent about an hour-and-a-half filming the obstacle course with my son, using my iPhone and a chest-mounted camera, then used Adobe Premiere Pro to edit it. If you do not have APP, Adobe Spark is a free video editing program, or the iMovie app comes already installed on iPhones. The music was chosen from a variety of royalty-free options. Since posting the video online, we have had over 1,500 views of the video, and community engagement has been wonderful! On Friday there were several families, sitting in their cars in the parking lot, waiting their turn to use the course.
Our plans are to keep and maintain our course for as long as possible. We may have to do paint touch-ups in the future. It will be interesting to see how the course holds up to an Illinois winter. If anyone has any questions about installing a sidewalk obstacle course of your own, please feel free to reach out!
Our guest blogger today is Donna Forbis. Donna is the Marketing & Events Coordinator at the Illinois Prairie District Public Library in Metamora, Illinois. You can watch the full length version of her video on the My Library Is... Sharing Showcase page.